While its underlying chipset is Exynos based, yet there are already quite a few custom binaries available for it. Likewise, the custom development is also brimming with tons of mods for this device. Be it the custom recovery like TWRP, gaining access to the system partition via Magisk, or flashing of the plethora of ZIP and IMG files, the possibilities stand endless. There stands just one requirement from your end- an unlocked bootloader. Once you do so, you have literally opened the floodgates to the plethora of tweaks. In this guide, we will be looking at two of the most important ones. Today, we will show you how to install the TWRP Recovery and root your Samsung Galaxy A51 device. Likewise, we will also make you aware of the associated benefits and risks of these tweaks. So without further ado, let’s get started.
How to Root any Samsung device via Magisk and OdinHow to Patch Samsung AP Firmware via MagiskSteps to Flash magisk_patched.tar (patched Samsung AP file) via OdinHow to Patch Samsung AP Firmware via Magisk
Benefits and Risks of TWRP and Rooting Samsung Galaxy A51
The most popular custom recovery out there, Team Win Recovery Project or TWRP beholds a plethora of options. These include the likes of creating and restoring Nandroid Backups, wiping various partition on your device, flashing IMG and ZIP files, and even rooting your device via Magisk. While you could also root the device without TWRP, but that calls for a lot of effort ( patching and flashing the stock boot. img). Anyway, once rooted, you would have gained administrative privileges. This in turn will allow you to flash Magisk Modules, Xposed Framework, Substratum Themes, etc. However, these tweaks come with a few risks as well. When you unlock the device’s bootloader, you will have to bid adieu to the device’s warranty. Likewise, all the data on your device will be wiped off.
How to Install TWRP Recovery and Root Samsung Galaxy A51
The entire instructions have been listed out in separate sections for ease of understanding. Follow along in the exact same sequence as mentioned. Droidwin and its members wouldn’t be held responsible in case of a thermonuclear war, your alarm doesn’t wake you up, or if anything happens to your device and data by performing the below steps.
STEP 1: Unlock Galaxy A51 Bootloader
First and foremost, you will have to unlock the bootloader on your Galaxy A 51 device. For that, please refer to our detailed guide on How to Unlock the Bootloader on Samsung Galaxy A51. Once this is done, proceed to the next step to install the TWRP Recovery and root your Samsung Galaxy A51.
New Method to Boot to Recovery Mode on Samsung OneUI 3.0 Android 11How to Stop Samsung Find My Device Offline Finding NotificationsSteps to Create Samsung Combination Firmware and Flash it via OdinHow to Boot Rooted Samsung to Recovery Mode and Rooted OS
STEP 2: Download the Required Files
Here are all the files that you need to download in order to install the TWRP Recovery and root your Samsung Galaxy A51 device. Credit to XDA Member azteria2000 for TWRP and MultiDisabler files.
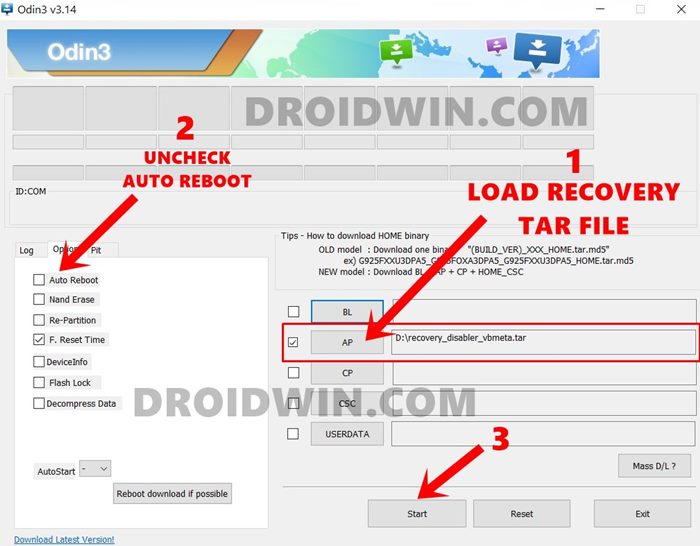
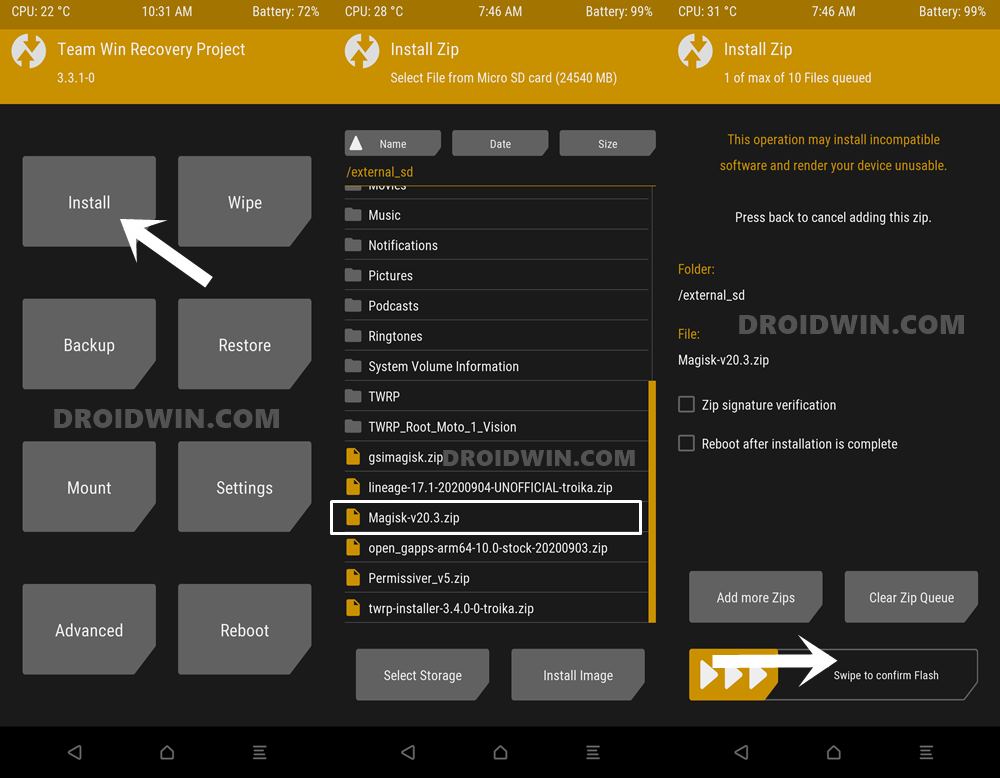
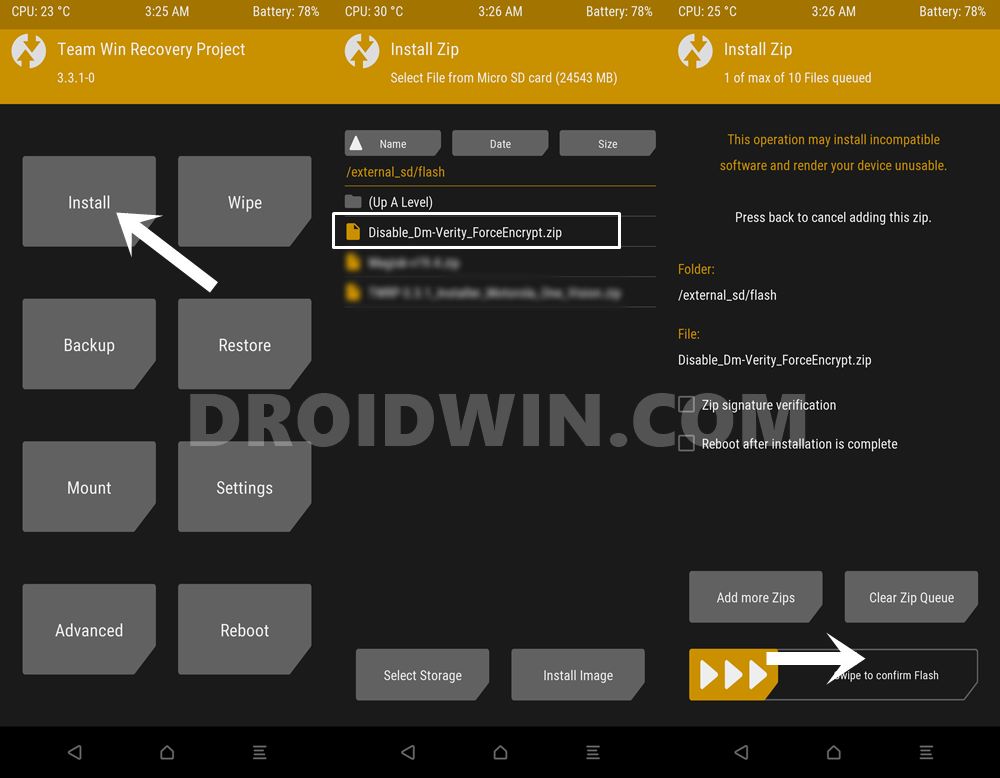
TWRP for Samsung Galaxy A51: recovery_disabler_vb_meta.tarMultiDisabler for Samsung: multi_disabler_samsung_3_1.zipMagisk Installer to Root your device: Magisk ZIPDisable_DM-Verity_ForceEncrypt to Decrypyt the Data partition: no-verity-opt-encrypt-6.1.zip.
STEP 3: Boot Samsung Galaxy A51 to Download Mode
Next up, you will have to boot your deivce to the Download Mode. Refer to the below steps for that. You may also refer to our guide on this topic: How to Boot any Samsung Device to Download Mode.
STEP 4: Install Odin on your PC
STEP 5: Install TWRP Recovery on Samsung Galaxy A51 via Odin
With this, TWRP has been installed on your device. But before performing any other action, you should directly boot to TWRP, as mentioned below.
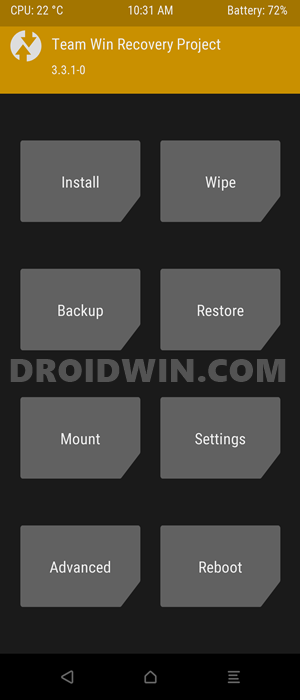
STEP 6: Boot Samsung Galaxy A51 to TWRP
STEP 7: Decrypt Data Partition on Samsung Galaxy A51
As of now, your device will be booted to TWRP, so it’s time to decrypt the data partition. Follow along for the detailed instructions: That’s it. With this, the data partition has been successfully decrypted. Let’s now proceed to the final step to root your Samsung Galaxy A51 device. Even if you don’t wish to root, you should flash the Disable_DM-Verity_ForceEncrypt ZIP file, as mentioned below. Flashing this file is a must, irrespective of the root.
How to Install Android 11 (OneUI 3.0) on any Samsung Phone via OdinDowngrade Samsung from Android 11 to Android 10 (OneUI 3.0 to 2.0/2.5)Download Samsung Stock Firmware/ROM via Frija ToolHow to Update Magisk ZIP and Magisk Manager (without TWRP)
STEP 8: Root Samsung Galaxy A51 via Magisk
The boot might take a few minutes. This is completely normal. Furthermore, you will have to set up the device from scratch, as a complete wipe has taken place. On that note, we conclude the guide on how to install the TWRP Recovery and root your Samsung Galaxy A51. If you have any queries concerning the aforementioned steps, do let us know in the comments section below. We will get back to you with a solution at the earliest.
New Method to Boot to Recovery Mode on Samsung OneUI 3.0 Android 11How to Stop Samsung Find My Device Offline Finding NotificationsSteps to Create Samsung Combination Firmware and Flash it via OdinHow to Boot Rooted Samsung to Recovery Mode and Rooted OS
About Chief Editor