The Android ecosystem, thanks to its open-source nature, allows you to carry out a plethora of tweaks. For the starters, users are likely to try out tons of themes, icon packs, font styles, custom launchers, and other related things. And for the tech enthusiast, they take it a step further. By unlocking the bootloader of their device, they are able to flash an altogether new OS based on Android on their devices.
Apart from that, you could also replace your stock recovery with a custom recovery like TWRP. The benefits of this are aplenty. For example, you could create a Nandroid backup, flash ZIP and IMG files, use the MTP features, etc. Likewise, you could also get access to your system partition by rooting your device. Well, we could go on and on listing the benefits. However, things are as simple as it looks. All these practices come with associated risks as well. The thing is since you are into the custom development scene, you already have an idea or two about how to get back your device into normal working conditions. Most of you might be aware of the fact that the best escape route involves booting your device to fastboot and then simply flashing the stock firmware. However, this trick only works when your device is in a bootloop or a soft-bricked state. The good thing is most often than not, this fastboot-flash escape route works pretty well. But not always! If your device gets hard-bricked, then you wouldn’t be even able to flash the stocks firmware at that point in time. The reason? If your device is bricked then you can’t even boot your device to fastboot. Nor you could boot your device to TWRP recovery and flash any other custom ROM. So what could be done in such a case? Sometimes, you might also get this scary message that Your device is corrupt. It cannot be trusted and will not boot. Don’t worry, we will help you in getting this trust back!
Most of the users at this point in time just rushes to the nearby OnePlus service center. The thing is: what these developers do at the service center, you could do the same at your home as well. And the entire process is only software-related, we wouldn’ be tweaking any of the hardware parts. With that said, here are the complete instructions to Unbrick OnePlus 7 from a dead state. Let’s begin Now to Unbrick Your OnePlus 7 Device from Dead State All the Qualcomm based devices come with a special boot mode controlled by the primary bootloader, dubbed as Emergency Download (EDL). OEMs generally bake this mode deep into the device, not accessible from even the tech geeks. One method to access this is via the Test Point method (which involves forcibly opening the back of your device and playing with one or two copper wires). But in that process, there are tons of things involved, most of which are quite dangerous even from our point of view. And hey, we also promised that we wouldn’t be taking the hardware route. So the next and much easier method involves the use of the EDL Mode. Today we will make full use of this mode to unbrick your OnePlus 7 device from a dead state. So without further ado, let’s begin with the guide.
Prerequisites
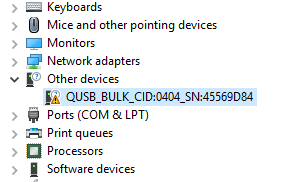
Before we begin with the process, here are a few points to be kept in mind. Well, we always begin by telling you to create a backup of your entire device, but in this case, that’s completely useless. Similarly, you can’t even enable USB Debugging as well. So the only requirement that we would suggest to you is that your device should be at least 60% charged. Since the device is in a bricked state and you wouldn’t be able to get a clue regarding the battery percentage, it is better to connect your device to a charger and wait for around 30-45 minutes. Furthermore, we will be requiring the Qualcomm USB Drivers to be installed on your PC. However, Windows might conflict with the proper functioning of these drivers. Therefore, you will have to enable the Test Signing Mode before installing these drivers. For that, click on the Start menu, search for Command Prompt, and launch it as an administrator. Now type in the below command and hit Enter: That it. Now Reboot your PC. You have now successfully enabled Test Signing Mode. Now download the Qualcomm USB Drivers from the next section.
Downloads
Here are the files that you need to download in order to unbrick your OnePlus 7.
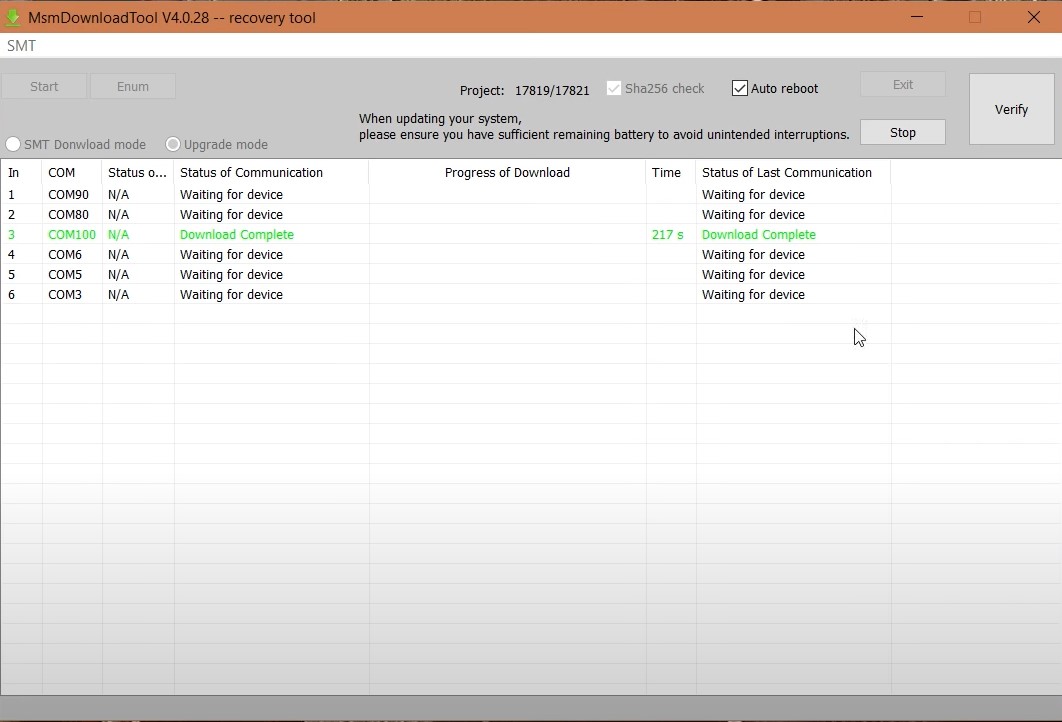
Qualcomm USB Drivers: This is the most important file, without it the entire process is null and void. The full name of this driver is Qualcomm HS-USB QDLoader 9008 Drivers. Download the drivers from below. This is the automatic installation setup files for the Qualcomm drivers.32-bit version: QDLoader_HS-USB_Driver_32bit_Setup.exe | 64-bit version: QDLoader_HS-USB_Driver_64bit_Setup.exeThere is also a Manual method for installing the Qualcomm HS-USB QDLoader 9008. if the automatic method fails n your case (which it shouldn’t as there is no reason for the same), then you could try the manual method. For that, download the Qualcomm-Driver.zip file.MSM Download Tool: We will be using this tool to bring your device back from dead. Download MSM Download ToolStock ROM for your OnePlus 7: Download the required firmware from below. Huge kudos to Titokhan for these files! Do keep in mind that packages with build tag GM57AA are intended for the following variants:GM1901: IndiaGM1905: GlobalPackages with build tag GM57BA are intended for the following variant:GM1903: EUSigned flashable zips GM57AA …………………………………………….. 10.0.2: OnePlus7Oxygen_14.O.22_OTA_022_all_1911070324 MD5: 04653563c1b9715c78e3c47822ec6be8 10.0.1: OnePlus7Oxygen_14.O.21_OTA_021_all_1910071452 MD5: 3eb614156126eb33eba5a7d8bb44ffb8 10.0: OnePlus7Oxygen_14.O.20_OTA_020_all_1909172052 MD5: d64295d0c32e779dcced66ba2d85c2b6 9.5.8: OnePlus7Oxygen_14.O.14_OTA_014_all_1907280717 MD5: 0b766e097a9a7d4d9493f061992f8360 9.5.7: OnePlus7Oxygen_14.O.13_OTA_013_all_1907122308 MD5: dbcf78975e81a1770df8aa8b96f25aa9 9.5.6: OnePlus7Oxygen_14.O.12_OTA_012_all_1906211401 MD5: 54a48ccba52d58110b6e4e06e6caa881 9.5.5: OnePlus7Oxygen_14.O.11_OTA_011_all_1906072127 MD5: e570c7e6bdd86785d7b3a323cf69bf1 9.5.4: OnePlus7Oxygen_14.O.10_OTA_010_all_1905230221 MD5: 6b7213825261d9dfd5d10fd4b8ed1003GM57BA …………………………………………….. 10.0.2: OnePlus7Oxygen_14.E.22_OTA_022_all_1911070324 MD5: 40b829a4d27a74c59896f21ce110e502 10.0.1: OnePlus7Oxygen_14.E.21_OTA_021_all_1910071445 MD5: b7d0e78beba1436e4d73b1066e8b399c 10.0: OnePlus7Oxygen_14.E.20_OTA_020_all_1909172051 MD5: 76c2a738df1de3d525068ba2e5f4c485 9.5.8: OnePlus7Oxygen_14.E.14_OTA_014_all_1907280716 MD5: bd8bc0520d319ff426b7d58eba5b4964 9.5.7: OnePlus7Oxygen_14.E.13_OTA_013_all_1907122301 MD5: 14c7850ff32534d5496c378ee03b8f45 9.5.6: OnePlus7Oxygen_14.E.12_OTA_012_all_1906211402 MD5: 58242729a73830d537f129806b1088e5 9.5.5: OnePlus7Oxygen_14.E.11_OTA_011_all_1906072127 MD5: c3c4c37ab1af4a4c1bbc0d0e232e3179 9.5.4: OnePlus7Oxygen_14.E.10_OTA_010_all_1905230229 MD5: 7dc363bedb1be48d4175912fa879d1b8Open Beta ………………………………………….. OB6: OnePlus7Oxygen_13.W.17_OTA_017_all_1911152153 MD5: 496f17606dc9da8f39b5641ae1a00a38 OB5: OnePlus7Oxygen_13.W.15_OTA_015_all_1910300125 MD5: f7e1037d948ba9fd87682073b7a1db9f OB4: OnePlus7Oxygen_13.W.14_OTA_014_all_1910231426 MD5: OB3: OnePlus7Oxygen_13.W.11_OTA_011_all_1910081730 MD5: 401d2a1e769b26a69aad7625dd01514d OB2: OnePlus7Oxygen_13.W.10_OTA_010_all_1909112326 MD5: OB1: OnePlus7Oxygen_13.X.09_OTA_009_all_1909030312 MD5: Rollback: fulldowngrade_wipe_MSM_18857_190505_1527_user.zip MD5:Stock boot-recovery images GM57AA ……………………………………………………. 9.5.6: OnePlus7Oxygen_14.O.12_OTA_012_all_1906211401_boot.img 9.5.5: OnePlus7Oxygen_14.O.11_OTA_011_all_1906072127_boot.img 9.5.4: OnePlus7Oxygen_14.O.10_OTA_010_all_1905230221_boot.imgGM57BA ……………………………………………………. 9.5.6: OnePlus7Oxygen_14.E.12_OTA_012_all_1906211402_boot.img 9.5.5: OnePlus7Oxygen_14.E.11_OTA_011_all_1906072127_boot.img 9.5.4: OnePlus7Oxygen_14.E.10_OTA_010_all_1905230229_boot.imgWhatever ROM you are downloading make sure to transfer it inside the folder where the MSM Tool is present. Otherwise, the tool wouldn’t be able to find the stock firmware file.
That’s it. These are all the files that you will be needing. Now follow the below steps to unbrick your OnePlus 7 device.
GM1903: EU
Instructions to Unbrick your OnePlus 7
Conclusion
With that, we conclude the guide on how to unbrick your OnePlus 7 and bring it back from dead. The steps might feel a little daunting at first, but just follow all the steps in the mentioned manner and it will be a cakewalk. On that note, we will like to your attention on the stock firmware file that we shared. It might be belonging to an older date, but that is not an issue. Once your device boots, you will receive an OTA with the latest firmware. Simply install it right away. If you still have any doubts left, do drop in your queries in the comments section below, or JOIN US ON TELEGRAM. We will get back to you with a solution. Likewise, here are some other root, recovery, and ROM articles that you should check out:
[3 METHODS] Unroot any Android Device-Uninstall Magisk[GUIDE] Flash ROMs/Magisk/TWRP/Kernels on A/B Partition DevicesHow to Root Android Devices via TWRP RecoveryHow to Root Android Devices Without TWRP RecoveryBoot Any Android Device to TWRP Recovery
About Chief Editor