If it qualifies for your region, you could directly use that file and head over to the patching instructions. Otherwise, we will also list out the step by step instructions to extract and patch the boot.img file. You may refer to those steps too. Just to be on the safer side, we would recommend you to go with the latter one, i.e manual extraction. This will make sure that there isn’t any firmware version conflict. Furthermore, while you could install the OTA on the non-rooted devices via the ABD sideload method, there is now a handy method to install OTA on your rooted OnePlus as well. There is no denying the fact that OnePlus devices are known to provide feature-rich devices at an affordable price. And continuing this tradition is their latest offering. Dubbed as the OnePlus Nord, it beholds a pretty strong specs sheet and could put many mid-rangers to shame. There are many reasons to justify these claims of ours. And one should look no further than the specs that it has for the masses. While there are indeed quite impressive features for a device priced in the mid-range, yet you could consider this to be the entry point. There are a plethora of customizations available waiting for you at the other side of the gate. And in this guide, we will help you make full use of those tweaks. So without further ado, here are the required instructions to root OnePlus Nord without using TWRP Recovery. Follow along. OTHER ONEPLUS NORD ARTICLES
Download OnePlus Nord Stock Boot Image Files [All Versions]How to Unlock the Bootloader on OnePlus NordInstall TWRP Recovery on OnePlus NordHow to Root OnePlus Nord using TWRP Recovery
How to Root OnePlus Nord without TWRP (using Patched Boot file)
Before we list out the steps for that, there are a few prerequisites that your device needs to qualify. Make sure to go through each of these points before proceeding ahead.
Prerequisites
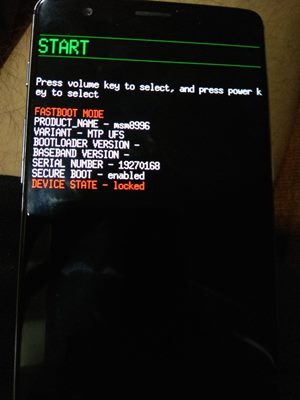
Create a complete backup of your Nord device. Although rooting in itself doesn’t wipe the data, but it is always recommended to be on a safer side.Furthermore, your device’s bootloader should also be unlocked. If you haven’t done so, refer to our detailed guide on How to Unlock the Bootloader on OnePlus Nord.Likewise, download and install the Android SDK Platform Tools onto your PC. This will be required so as to execute ADB and Fastboot Commands. The ADB commands will be needed to boot your device to Fastboot Mode. The latter will be needed to execute fastboot commands to flash the patched boot file.Don’t forget to enable USB Debugging on your Nord device as well. This is needed so that your PC successfully recognizes your device is successfully recognized in ADB Mode.
Now that we are done with the requirements section, download all the necessary files from the below section and proceed with the steps to root your OnePlus Nord.
Downloads
Get hold of the Magisk Manager APK file. We wouldn’t be needing the Magisk Installer ZIP file for this tutorial, just the APK file will be sufficient.OnePlus Nord Stock Boot Image: AC01AA Global, AC01DA India, AC01BA Europe variants (OOS 10.5.2, 10.5.3, 10.5.4)However, if the stock boot.img file for your firmware version/region isn’t available, not an issue. We have listed detailed steps on how to extract and patch that file. Follow the below steps for that.
These were all the files that we would be needing for this guide. You could now proceed with the steps to root your OnePlus Nord. As the saying goes “Droidwin or any of its members won’t be held responsible if your cat ends up damaging your device, there is a thermal nuclear war or you end up with a bricked or boot looped device”. However, in the case of the latter, you may drop in your queries in the comments section below. We would definitely help you out. MAGISK GUIDES
[GUIDE] Flash ROMs/Magisk/TWRP/Kernels on A/B Partition DevicesEverything About Magisk- Manager, Modules and MoreBest Magisk Modules of 2020 [PART-1][3 METHODS] Unroot any Android Device-Uninstall Magisk
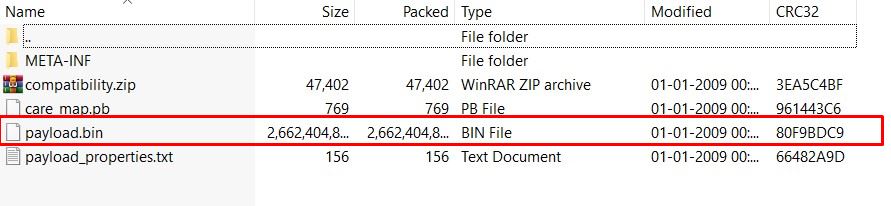
STEP 1: Getting the Stock Boot.img File
If your device variant matches with the stock boot.img file that we have provided above, then you could easily use that. Otherwise, follow the below steps to extract the stock boot.img file.
STEP 2: Patch Stock Boot.img via Magisk
Now that you have got your hands on the stock boot.img file, it is time to patch it via Magisk. Since the Magisk app has undergone a major UI overhaul, we are updating this guide to include the steps for the Magisk builds. First off, we will show you the steps for older Magisk which will then be followed by the newer Magisk build. As far as the differences between both these builds are concerned, well the underlying functionalities for both are some, it’s just some UI tweaks here and there. So which one should you choose? Well, I would highly recommend that you go ahead with the newer Magisk build because sooner than later you will have to make the switch as and when your OnePlus Nord gets the Android 11 update. The below two guides shall help you in that case:
Root Android 11 via Magisk Patched boot.img (without TWRP)Fix Magisk patched boot.img issue while Rooting Android 11
With that said, let’s now proceed with the steps to patch the stock boot.img file via Magisk and then root your OnePlus Nord.
Method A: If you are using older Magisk
Method B: If using the Newer Magisk
So with this, you have successfully patched the stock boot file. It is now time to flash it onto your device. Here is how to do so. TWRP GUIDES
How to Install OTA Updates in Rooted Android DeviceHow to Permanently Install TWRP without TWRP ZIP File (only using TWRP.img file)Root Android Devices Without TWRP RecoveryHow to Fix TWRP Error 7 (While Flashing Custom ROM via TWRP)
STEP 3: Flash magisk_patched.img onto OnePlus Nord
We will be now using the fastboot commands to flash this patched boot file onto your device. For that, make sure that you have installed Android SDK Platform Tools on your PC. That is it. These were the steps to root your OnePlus Nord device. While the steps might seem to be quite lengthy, but trust us, this is quite an easy method. Just follow the steps as mentioned and you should have no trouble whatsoever. However, if you get stuck at any steps, do let us know your queries in the comments section below. We will get back to you with the fix in no time!
BUY: OnePlus Nord 5G (Gray Onyx, 8GB RAM, 128GB Storage) | OnePlus Nord 5G (Marble Blue, 8GB RAM, 128GB Storage)
About Chief Editor